How to Bleed Your Car's Brakes on the Roadside: Safety First
Understanding When and Why You Need to Bleed Your Brakes: Roadside Brake Issues Explained
Alright, so you're cruising along, windows down, singing off-key to your favorite tunes, and suddenly... your brakes feel spongy. Or worse, they barely work at all. Panic sets in, right? But before you call for a tow (and a hefty bill), let's talk about bleeding your brakes on the roadside. This isn't something you'll do every day, but knowing how can save your bacon – and your wallet – in a pinch. The most common reason? Air in the brake lines. This can happen if you've recently worked on your brakes (like replacing pads or calipers) or if your brake fluid is low, allowing air to sneak in. A leak in the system can also cause low fluid and air intrusion. Spongy brakes are the telltale sign. Instead of a firm, responsive pedal, it feels like you're pushing down on a marshmallow. That's air compressing instead of hydraulic pressure building up. Another sign? Your brakes feel weaker than usual. You might have to press the pedal further down to get the same stopping power. This is a serious safety issue, so don't ignore it! If you're experiencing these symptoms, pulling over and checking your brake fluid level is the first step. If it's low, top it off (using the correct type of brake fluid, of course!). If that doesn't solve the problem, or if the fluid is completely empty, you've likely got a leak, and bleeding the brakes might buy you enough time to get to a shop.
Essential Tools and Safety Gear for Roadside Brake Bleeding: Brake Bleeding Kit Essentials
Okay, so you've diagnosed the problem and decided to bleed your brakes. Great! But before you start wrenching, you need the right tools and, more importantly, the right safety gear. This isn't a job you want to rush or take shortcuts on. First, safety. Wear safety glasses. Brake fluid is nasty stuff and can seriously irritate your eyes. Gloves are also a must. Brake fluid can damage your skin and even your car's paint. Nitrile gloves are best. Now, for the tools. You'll need a wrench to open and close the bleeder screws. The size varies depending on your car, so check your owner's manual or do a quick online search. A flare nut wrench is ideal because it grips the bleeder screw on more sides, reducing the risk of rounding it off. You'll also need a clear hose and a container to collect the old brake fluid. A dedicated brake bleeder kit is the easiest way to go. These kits typically include a hose, a one-way valve to prevent air from being sucked back in, and a collection bottle. If you don't have a kit, you can use a length of clear tubing and an empty water bottle. Finally, you'll need some fresh brake fluid. Again, check your owner's manual for the correct type. Using the wrong fluid can damage your brake system. DOT 3 and DOT 4 are the most common types. And don't forget a jack and jack stands! You'll need to safely lift the car to access the bleeder screws. Never work under a car supported only by a jack. Jack stands are essential for safety.
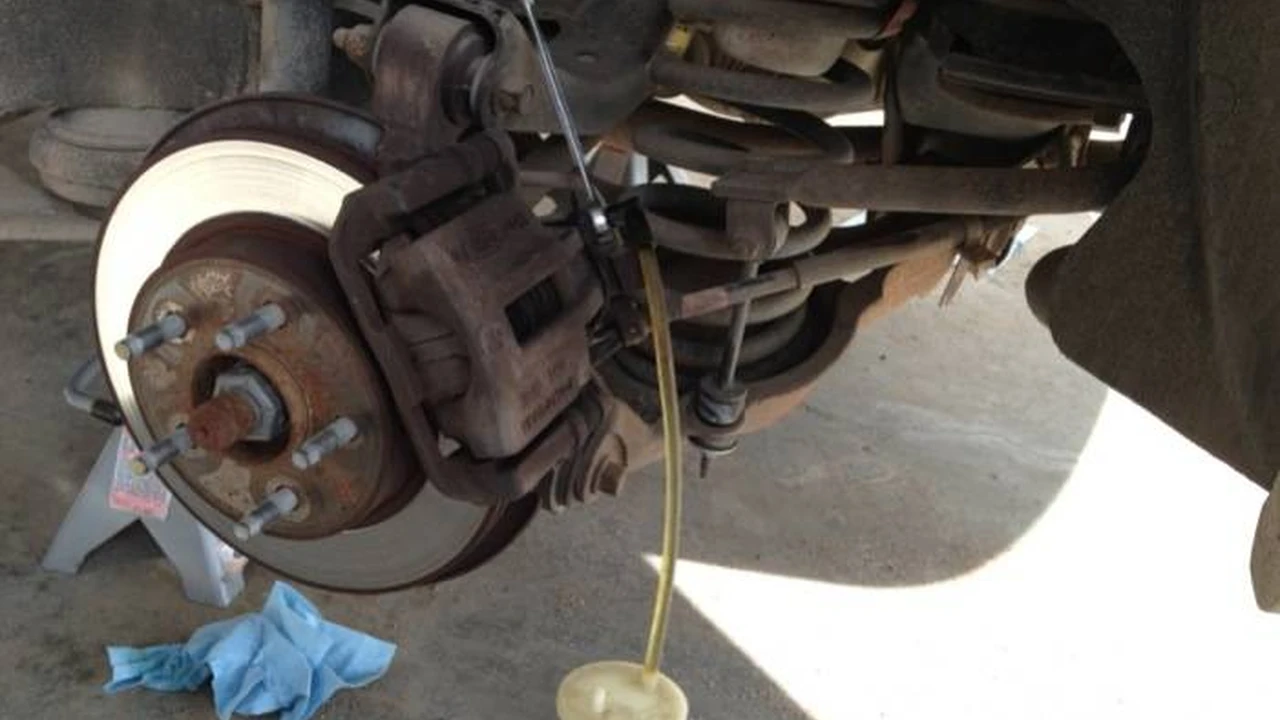
Step-by-Step Guide to Bleeding Your Brakes on the Road: Roadside Brake Bleeding Procedure
Alright, safety first, car's secured on jack stands, and you've got your tools ready. Let's get this done. 1. Identify the Bleeder Screws: These are small screws located on the brake calipers (or wheel cylinders on older cars). They usually have a rubber cap on them. Remove the cap. 2. Attach the Hose: Slide one end of the clear hose onto the bleeder screw. Place the other end into your collection container. Make sure the end of the hose is submerged in brake fluid in the container. This prevents air from being sucked back in. 3. Loosen the Bleeder Screw: Using your wrench, gently loosen the bleeder screw. Don't open it too much, just enough to allow fluid to flow. 4. Pump the Brakes: Have a helper slowly pump the brake pedal several times, then hold it down. While the pedal is held down, open the bleeder screw. You'll see fluid (and hopefully air bubbles) flowing through the hose. 5. Close the Bleeder Screw: Before your helper releases the brake pedal, close the bleeder screw. This is crucial to prevent air from being sucked back into the system. 6. Repeat: Repeat steps 4 and 5 until you see a steady stream of brake fluid without any air bubbles. 7. Tighten and Repeat for Each Wheel: Once you're satisfied that all the air is out, tighten the bleeder screw to the manufacturer's recommended torque (check your service manual). Repeat the process for each wheel, starting with the wheel furthest from the master cylinder (usually the right rear). The bleeding order is typically: Right Rear, Left Rear, Right Front, Left Front. 8. Check Brake Fluid Level: After bleeding all four wheels, check the brake fluid level in the master cylinder and top it off as needed. 9. Test Your Brakes: Before driving, pump the brakes several times to make sure they feel firm. Then, take a short test drive at low speed to ensure they're working properly.
Troubleshooting Common Brake Bleeding Problems: Brake Bleeding Issues and Solutions
Even with a good guide, things can go wrong. Here are some common problems and how to fix them: * Rounded Bleeder Screw: If you round off the bleeder screw, you're in trouble. Try using a penetrating oil and a set of vise-grips to remove it. If that doesn't work, you might need to replace the caliper. * Bleeder Screw Won't Loosen: Again, penetrating oil is your friend. Let it soak for a while before trying to loosen the screw. You can also try heating the area around the screw with a heat gun (carefully!) to help loosen it. * Air Keeps Coming Out: This could be a sign of a leak in the brake system. Check all the brake lines and connections for leaks. If you can't find a leak, you might have a problem with the master cylinder. * Spongy Brakes After Bleeding: Double-check your work. Make sure you bled all four wheels in the correct order. If the problem persists, you might have a more serious issue, such as a faulty master cylinder or ABS module.
Recommended Brake Bleeding Tools and Kits: Best Brake Bleeding Kits and Products for Roadside Repairs
Okay, let's talk gear. Having the right tools makes this job way easier and safer. Here are a few recommendations: * Motive Products Power Brake Bleeder: This isn't exactly a roadside tool (it requires an air compressor), but if you're serious about brake maintenance, it's a game-changer. It pressurizes the brake fluid reservoir, allowing you to bleed the brakes by yourself. It sells for around $100-$150. Great for your garage, not so much on the shoulder of the highway. * One-Man Brake Bleeder Kit: These kits typically include a hose, a one-way valve, and a collection bottle. They're affordable (around $20-$40) and easy to use. Brands like Phoenix Systems and Lisle make good ones. Perfect for the roadside scenario. The one-way valve is key for preventing backflow. * Flare Nut Wrench Set: A good set of flare nut wrenches is essential for working on brake lines and bleeder screws. They grip the fitting on more sides than a standard wrench, reducing the risk of rounding it off. A decent set will cost you $30-$60. * Brake Fluid Tester: This little gadget measures the moisture content of your brake fluid. Moisture can cause corrosion and reduce braking performance. A simple tester costs around $10-$20. Knowing when to change your fluid is crucial. * Brake Fluid: Don't skimp on brake fluid. Use a quality brand like Valvoline, Castrol, or ATE. Make sure you use the correct type for your car (DOT 3, DOT 4, or DOT 5.1). A quart will cost you around $10-$20.
Brake Fluid Types and Compatibility: DOT 3 vs DOT 4 vs DOT 5 Brake Fluid Explained
This is crucial! Using the wrong brake fluid can damage your brake system. Here's the lowdown: * DOT 3: The most common type. Glycol-based. Compatible with most older cars. * DOT 4: Also glycol-based, but with a higher boiling point than DOT 3. Can be used in place of DOT 3 in most cars, but check your owner's manual. * DOT 5: Silicone-based. NOT compatible with DOT 3 or DOT 4. Used in some high-performance cars and motorcycles. Using DOT 5 in a system designed for DOT 3 or 4 can cause serious damage. * DOT 5.1: Glycol-based with an even higher boiling point than DOT 4. Compatible with DOT 3 and DOT 4 in some cases, but again, check your owner's manual. Always check your owner's manual to determine the correct type of brake fluid for your car. Mixing different types of brake fluid can be dangerous and can damage your brake system.
Preventative Maintenance to Avoid Roadside Brake Bleeding: Extending the Life of Your Brakes
The best way to avoid bleeding your brakes on the side of the road is to keep them in good condition in the first place. Here are a few tips: * Check your brake fluid level regularly: Low brake fluid is often the first sign of a problem. * Change your brake fluid every two years: Brake fluid absorbs moisture over time, which can lead to corrosion and reduced braking performance. * Inspect your brake lines and hoses for leaks: Leaks can cause low brake fluid and air in the system. * Replace your brake pads and rotors when they're worn: Worn brake components can cause reduced braking performance and can damage other parts of the brake system. * Have your brakes inspected by a mechanic regularly: A mechanic can spot potential problems before they become serious.
Alternative Solutions When Roadside Brake Bleeding Fails: What to Do When You Can't Bleed Your Brakes
Sometimes, even with your best efforts, you just can't get the brakes bled properly on the roadside. What then? * Call for a tow: If you can't get the brakes working well enough to drive safely, don't risk it. Call for a tow truck and have your car taken to a mechanic. * Check for major leaks: If you're losing brake fluid rapidly, you likely have a significant leak. Don't attempt to drive the car until the leak is fixed. * Consider a mobile mechanic: In some areas, you can hire a mobile mechanic to come to you and perform repairs on the spot. This might be a better option than a tow if the problem is something relatively simple. Remember, safety first. Don't drive a car with faulty brakes. It's not worth the risk.
:max_bytes(150000):strip_icc()/277019-baked-pork-chops-with-cream-of-mushroom-soup-DDMFS-beauty-4x3-BG-7505-5762b731cf30447d9cbbbbbf387beafa.jpg)