How to Diagnose a Faulty Alternator on the Roadside: Testing
Alternator Troubleshooting Essentials Roadside Diagnosis
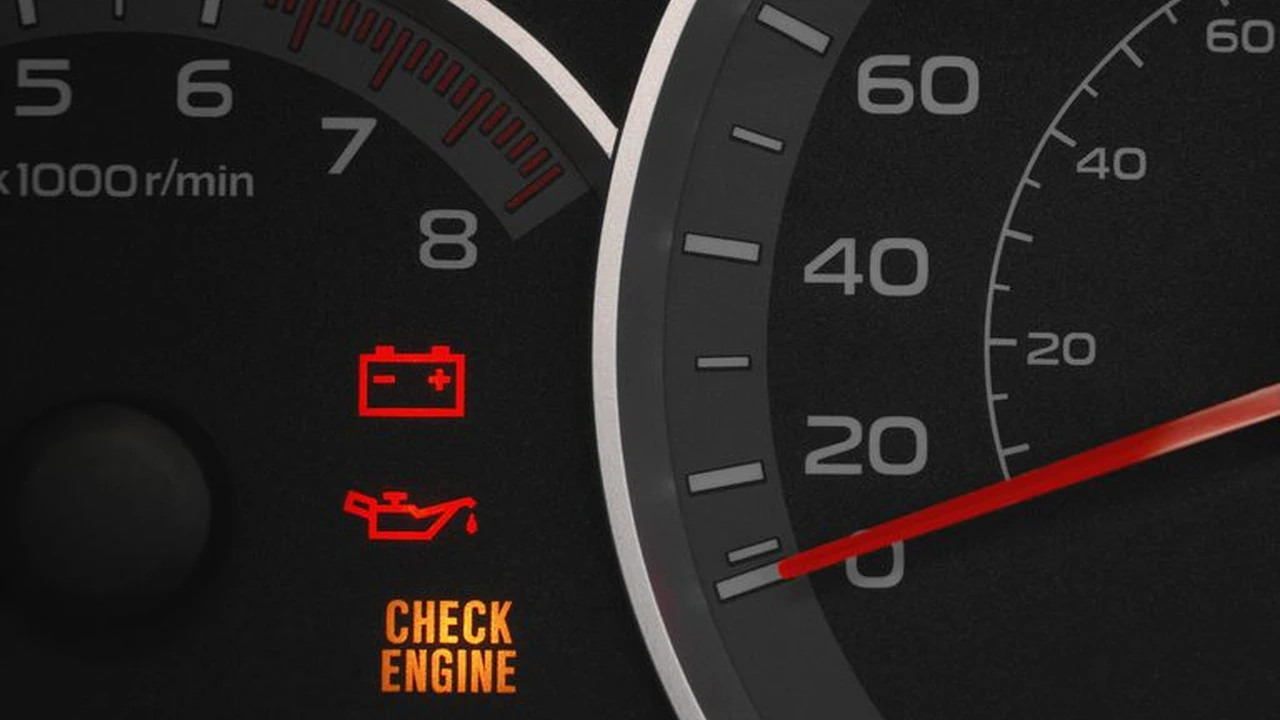
So, your car's dead on the side of the road. Fun times, right? One of the most common culprits is a failing alternator. The alternator is basically the heart of your car's electrical system. It charges the battery while the engine is running and powers all the electrical components like your lights, radio, and all those fancy gadgets. If it goes belly up, your battery will drain, and you'll be stranded. But don't panic! With a few simple tests, you can often figure out if the alternator is the problem before calling for a tow. We will cover alternator troubleshooting essentials and roadside diagnosis.
Tools You'll Need Alternator Testing Equipment
Before we dive in, let's gather our gear. You don't need a fancy mechanic's shop to do these basic tests. Here's what you'll want:
- A Multimeter: This is your best friend. A digital multimeter (DMM) is ideal, but an analog one will work in a pinch. Make sure it's set to measure DC voltage.
- Jumper Cables: Always a good thing to have on hand, even if the alternator isn't the problem.
- Safety Glasses: Protect those peepers!
- Gloves: Optional, but they can keep your hands clean and offer a bit of protection.
- A Basic Tool Set: You might need a wrench or socket to access the alternator's terminals.
- Your Car's Owner's Manual: It can be surprisingly helpful for locating the alternator and understanding your car's specific electrical system.
Visual Inspection Alternator Failure Symptoms
Okay, let's start with the easy stuff. Pop the hood and take a good look at the alternator. What are we looking for? Well, any obvious signs of damage. Look for:
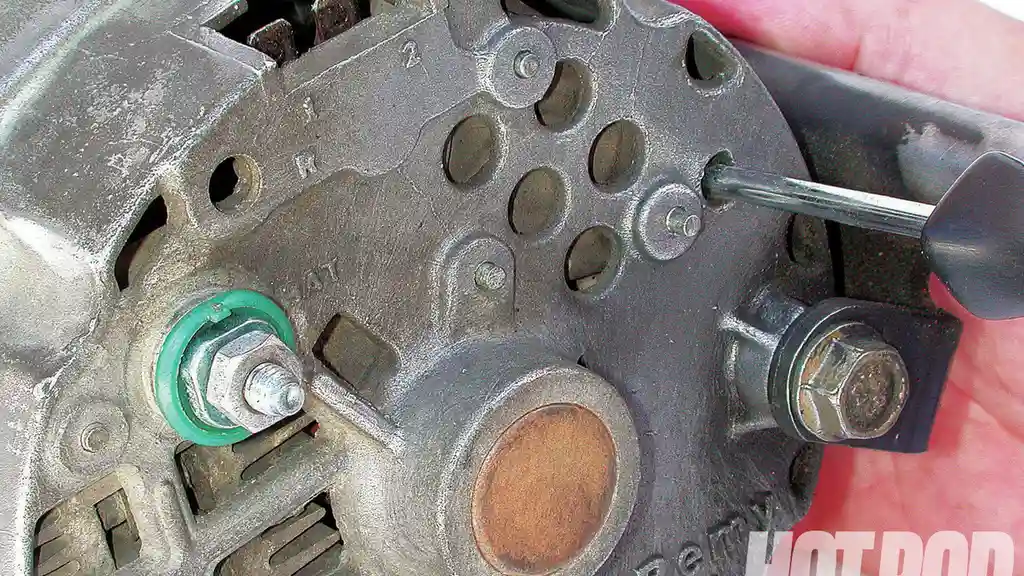
- Loose or Frayed Wires: Check the connections to the alternator. Are they secure? Are any wires broken or damaged?
- Corrosion: Corrosion on the terminals can prevent a good connection. If you see corrosion, clean it off with a wire brush or sandpaper.
- Loose Belt: The alternator is driven by a belt. Make sure the belt is tight and in good condition. A loose belt can cause the alternator to not charge properly. You should be able to press on the belt between pulleys and only have about ½ inch of deflection.
- Physical Damage: Has the alternator been hit by something? Are there any cracks or broken parts?
Also, pay attention to any unusual noises coming from the alternator area while the engine is running. A squealing or grinding sound could indicate a failing bearing or other internal problem.
The Voltage Test Alternator Voltage Output
Now for the main event: the voltage test. This will tell us if the alternator is actually producing the correct voltage. Here's how to do it:
- Set Your Multimeter: Turn on your multimeter and set it to read DC voltage (usually indicated by "VDC" or "DCV"). Choose a range that's higher than 15 volts (e.g., 20V).
- Connect the Leads: Connect the red (positive) lead of the multimeter to the positive (+) terminal of the battery. Connect the black (negative) lead to the negative (-) terminal of the battery.
- Read the Voltage: With the engine off, the battery voltage should be around 12.6 volts if it's fully charged. Anything below 12 volts indicates a discharged battery, which could be the *result* of a bad alternator, but not necessarily the *cause*.
- Start the Engine: Start the engine and let it idle.
- Check the Voltage Again: Now, with the engine running, the voltage should increase to somewhere between 13.7 and 14.7 volts. This indicates that the alternator is charging the battery. If the voltage is below 13.7 volts or above 14.7 volts, the alternator is likely faulty.
- Turn on Accessories: Turn on the headlights, radio, and air conditioner. The voltage should remain within the 13.7-14.7 volt range. If the voltage drops significantly when you turn on accessories, the alternator might be struggling to keep up with the electrical load.
Important Safety Note: Be careful when working around a running engine. Keep your hands and clothing away from moving parts like the belts and pulleys.
The Load Test Alternator Performance Under Load
The voltage test is a good starting point, but it doesn't tell the whole story. An alternator might produce the correct voltage at idle, but struggle when you put it under load. That's where the load test comes in.
Unfortunately, a true load test requires a specialized alternator tester, which most people don't have on the roadside. However, you can get a *rough* idea of the alternator's performance by observing the voltage drop when you turn on various electrical accessories. As mentioned above, a significant voltage drop (below 13.7 volts) indicates that the alternator might be weak.
Another thing you can try (if you have a helper) is to have someone rev the engine slightly while you're monitoring the voltage. If the voltage jumps up significantly when the engine is revved, it suggests that the alternator is capable of producing more power, but isn't doing so at idle. This could indicate a problem with the voltage regulator, which is often integrated into the alternator.
Understanding the Results Interpreting Alternator Test Results
Okay, so you've done the tests. Now what do the results mean?
- Low Voltage (Below 13.7V with Engine Running): This is the most common sign of a bad alternator. It means the alternator isn't producing enough voltage to charge the battery and power the electrical system.
- High Voltage (Above 14.7V with Engine Running): This is less common, but it's also a problem. It means the alternator is overcharging the battery, which can damage it. This is usually caused by a faulty voltage regulator.
- Voltage Fluctuates Wildly: If the voltage is jumping around erratically, it could indicate a loose connection, a bad voltage regulator, or a failing alternator.
- No Change in Voltage When Engine is Running: If the voltage remains the same whether the engine is on or off, the alternator is almost certainly dead.
Product Recommendations Best Alternators for Roadside Emergencies
If you've determined that your alternator is indeed the problem, you'll need to replace it. Here are a few options to consider, keeping in mind that roadside replacement is often a temporary fix to get you to a shop:
DB Electrical Alternators Budget-Friendly Alternator Options
Description: DB Electrical offers a wide range of alternators at very competitive prices. They're a good option if you're on a tight budget, but keep in mind that their quality might not be as high as some of the more expensive brands.
Use Case: A good choice for a temporary replacement to get you home or to a repair shop. Also suitable for older vehicles where you don't want to invest a lot of money in a new alternator.
Comparison: DB Electrical alternators are generally less expensive than brands like Bosch or Remy, but they might not last as long. Read reviews carefully before purchasing.
Price: Typically range from $80 to $200, depending on the vehicle.
Bosch Alternators Reliable and Durable Alternators
Description: Bosch is a well-known and respected brand in the automotive industry. Their alternators are known for their reliability and durability.
Use Case: A good choice for a long-term replacement, especially if you rely on your vehicle for daily commuting or long trips.
Comparison: Bosch alternators are generally more expensive than DB Electrical alternators, but they offer better performance and longer lifespan.
Price: Typically range from $150 to $400, depending on the vehicle.
Remy Alternators High-Performance Alternator Solutions
Description: Remy (formerly Delphi) is another reputable brand that offers high-quality alternators. They're often used as original equipment by many car manufacturers.
Use Case: A good choice if you want an alternator that meets or exceeds the original equipment specifications. Also suitable for vehicles with high electrical demands (e.g., vehicles with aftermarket audio systems or other accessories).
Comparison: Remy alternators are comparable to Bosch alternators in terms of quality and performance. They might be slightly more expensive in some cases.
Price: Typically range from $180 to $450, depending on the vehicle.
Specific Product Recommendations
- DB Electrical ADR0367 Alternator Compatible With/Replacement For Ford Taurus Sable 30L 38L 1996-1999: A budget-friendly option for these specific Ford models.
- Bosch AL7580N New Alternator: A reliable choice for many BMW models. Check compatibility with your specific year and engine.
- Remy 94170 New Alternator: A high-quality option for various GM vehicles. Again, verify compatibility.
Alternator Replacement Steps Roadside Alternator Replacement Tips
Replacing an alternator on the roadside is not ideal, but sometimes it's necessary. Here's a general overview of the steps involved. Always consult your vehicle's repair manual for specific instructions.
- Disconnect the Battery: This is crucial to prevent electrical shocks. Disconnect the negative (-) terminal first.
- Remove the Belt: Loosen the tensioner pulley and remove the belt from the alternator pulley.
- Disconnect the Wires: Disconnect the wires from the alternator terminals. Make sure to note which wire goes where.
- Remove the Alternator: Unbolt the alternator from its mounting brackets and remove it from the vehicle.
- Install the New Alternator: Install the new alternator in the reverse order of removal. Make sure all bolts are tight and the wires are securely connected.
- Install the Belt: Reinstall the belt and tighten the tensioner pulley.
- Reconnect the Battery: Reconnect the battery terminals, starting with the positive (+) terminal.
- Start the Engine and Test: Start the engine and check the voltage to make sure the new alternator is charging properly.
Safety Precautions Roadside Repair Safety
Roadside repairs can be dangerous. Here are a few safety precautions to keep in mind:
- Choose a Safe Location: Park your vehicle in a safe location, away from traffic. Turn on your hazard lights.
- Wear Safety Glasses and Gloves: Protect your eyes and hands.
- Use Jack Stands: If you need to lift the vehicle, always use jack stands to support it. Never work under a vehicle that is only supported by a jack.
- Be Aware of Hot Surfaces: The engine and exhaust system can be very hot. Be careful not to burn yourself.
- Don't Work Alone: If possible, have someone with you to help.
When to Call a Professional When to Seek Professional Help
While these tests can help you diagnose a faulty alternator, there are times when it's best to call a professional. If you're not comfortable working on your car, or if you're unsure about any of the steps involved, it's always better to err on the side of caution and seek professional help. Also, if you suspect the problem might be something other than the alternator (e.g., a bad battery, a wiring problem, or a faulty voltage regulator), it's best to have a qualified mechanic diagnose the issue.
Roadside Assistance Services Emergency Roadside Assistance
Don't forget about roadside assistance services. AAA, your insurance company, and even some credit card companies offer roadside assistance that can help you with a dead battery, a flat tire, or a faulty alternator. These services can be a lifesaver when you're stranded on the side of the road.
Preventative Maintenance Alternator Maintenance Tips
The best way to avoid alternator problems is to perform regular preventative maintenance. Here are a few tips:
- Check the Belt Regularly: Make sure the belt is in good condition and properly tensioned.
- Keep the Terminals Clean: Clean any corrosion from the terminals.
- Avoid Overloading the Electrical System: Don't run too many electrical accessories at the same time.
- Have the Alternator Tested Periodically: Have your mechanic test the alternator during routine maintenance.
By following these tips, you can help extend the life of your alternator and avoid being stranded on the side of the road.
:max_bytes(150000):strip_icc()/277019-baked-pork-chops-with-cream-of-mushroom-soup-DDMFS-beauty-4x3-BG-7505-5762b731cf30447d9cbbbbbf387beafa.jpg)