How to Check Your Brake Pads: Ensuring Safe Stopping Power
Why Checking Your Brake Pads is Crucial Car Safety Importance
Hey there, fellow drivers! Ever wondered what keeps you from rear-ending the car in front of you? Brakes, of course! And the unsung heroes of your braking system are your brake pads. These little guys are responsible for creating the friction that slows you down. But just like tires, they wear out over time. That's why knowing how to check your brake pads is super important – not just for your car's performance, but for your safety and the safety of everyone around you. Ignoring worn brake pads can lead to reduced stopping power, longer stopping distances, and potentially dangerous situations. Think about it: a few minutes checking your pads could prevent an accident. Plus, catching wear early can save you a ton of money on repairs down the line. We're talking avoiding damage to rotors, calipers, and even your ABS system. So, let's get to it!
Tools You'll Need for Brake Pad Inspection DIY Car Maintenance
Alright, before we dive in, let's gather our tools. You won't need anything fancy, promise! Here's what you'll want:
- A Lug Wrench: This is for loosening and removing your wheel lug nuts. Make sure you have the right size for your car!
- A Jack: A good quality jack is essential for lifting your car safely. Don't skimp on this one!
- Jack Stands: CRUCIAL! Never, ever work under a car supported only by a jack. Jack stands provide a stable and secure platform.
- Wheel Chocks: These go behind the wheels that are staying on the ground to prevent rolling.
- A Flashlight: For peering into the dark recesses of your wheel well.
- A Ruler or Brake Pad Gauge: To measure the thickness of your brake pads. A simple ruler will do in a pinch, but a dedicated gauge is more accurate.
- Gloves: Keeps your hands clean and protected. Brake dust is nasty stuff.
- Safety Glasses: Protect your eyes from brake dust and debris.
- Optional: A Wire Brush: For cleaning off any rust or debris on the brake components.
Got everything? Great! Let's move on.
Safety First Preparing Your Car for Brake Inspection Car Safety Tips
Okay, safety first! This isn't just a suggestion; it's a MUST. Follow these steps carefully:
- Park on a Level Surface: No hills! You want your car to be stable.
- Engage the Parking Brake: Make sure it's firmly engaged.
- Chock the Rear Wheels: Place wheel chocks behind the rear wheels. This prevents the car from rolling backward.
- Loosen the Lug Nuts: Before you lift the car, use the lug wrench to loosen the lug nuts on the wheel you're going to remove. Don't remove them completely yet, just break them loose.
Step-by-Step Guide How to Check Your Brake Pads Brake Pad Inspection Process
Alright, let's get our hands dirty (metaphorically, thanks to the gloves!). Follow these steps carefully:
- Jack Up the Car: Consult your owner's manual for the correct jacking points on your car. Place the jack securely under the designated point and lift the car until the tire is off the ground.
- Support with Jack Stands: THIS IS CRITICAL! Place the jack stands under the frame near the jacking point. Lower the car onto the jack stands. Make sure the car is stable before proceeding. Give it a good shake (gently!) to make sure it's secure.
- Remove the Wheel: Now that the car is safely supported, remove the lug nuts completely and carefully remove the wheel.
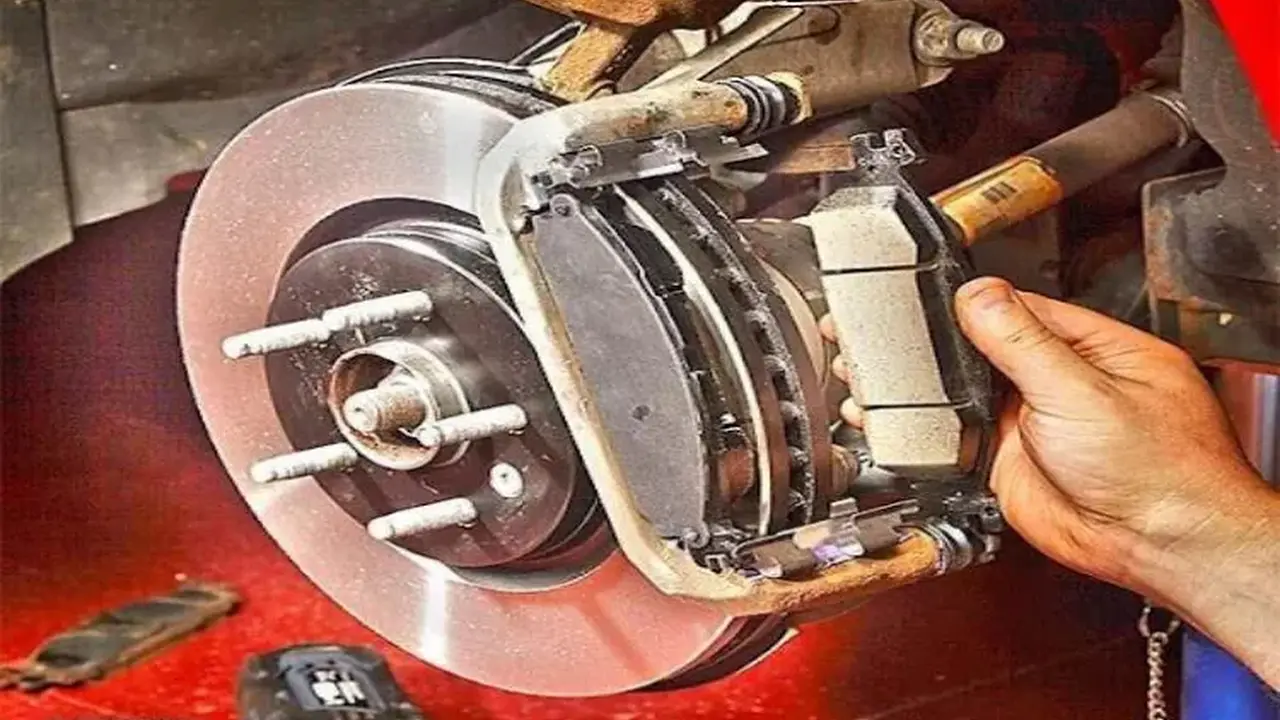
- Locate the Brake Pads: The brake pads are located inside the caliper, which is the clamp-like device that sits over the rotor (the shiny metal disc). You should be able to see the brake pads pressing against the rotor.
- Inspect the Brake Pad Thickness: This is the key part! You're looking for the thickness of the friction material on the brake pad. There should be a minimum thickness specified by the manufacturer (usually around 2-3mm or 1/8 inch). Use your ruler or brake pad gauge to measure the thickness. If the friction material is at or below the minimum thickness, it's time to replace your brake pads.
- Check for Uneven Wear: Look closely at the brake pads. Are they wearing evenly? If one pad is significantly thinner than the other, it could indicate a problem with the caliper or other brake components.
- Inspect the Rotor: While you're there, take a look at the rotor. Is it smooth and shiny? Or is it scored, grooved, or rusty? If the rotor is damaged, it may need to be resurfaced or replaced.
- Repeat on Other Wheels: Repeat the process on the other wheels to check all of your brake pads.
Recognizing Signs of Worn Brake Pads Car Maintenance Warning Signs
Even if you don't want to get your hands dirty, there are some telltale signs that your brake pads are wearing thin. Pay attention to these:
- Squealing or Screeching Noises: This is often the first sign that your brake pads are getting low. Many brake pads have a built-in wear indicator that makes a squealing noise when the pads are worn to a certain point.
- Grinding Noises: This is a more serious sign that your brake pads are completely worn down and the metal backing plate is rubbing against the rotor. This can cause significant damage to the rotors.
- Vibration or Pulsation in the Brake Pedal: This could indicate warped rotors or uneven brake pad wear.
- Longer Stopping Distances: If it's taking longer to stop than usual, your brake pads may be worn.
- Brake Warning Light: Some cars have a brake warning light that will illuminate when the brake pads are worn.
If you experience any of these symptoms, it's time to have your brakes inspected by a professional mechanic.
Brake Pad Replacement Choosing the Right Brake Pads Brake Pad Types and Brands
So, you've determined that your brake pads need replacing. Now what? There are a few things to consider when choosing new brake pads:
- Brake Pad Material: Brake pads come in a variety of materials, each with its own pros and cons:
- Organic Brake Pads: These are the cheapest option and are made from organic materials like rubber, glass, and resin. They're quiet and gentle on rotors, but they don't last as long as other types of pads.
- Semi-Metallic Brake Pads: These are a good compromise between price and performance. They contain a mix of metal and organic materials. They offer good stopping power and durability, but they can be noisier than organic pads.
- Ceramic Brake Pads: These are the most expensive option, but they offer the best performance and durability. They're quiet, generate less dust, and last longer than other types of pads.
- Driving Style: Consider your driving style when choosing brake pads. If you do a lot of stop-and-go driving, you'll want a pad that can handle the heat. If you do a lot of highway driving, you'll want a pad that's durable and long-lasting.
- Vehicle Type: Different vehicles have different braking requirements. Make sure you choose brake pads that are designed for your specific vehicle.
- Brand: There are many reputable brake pad brands to choose from, such as:
- Akebono: Known for their ceramic brake pads, offering quiet operation and low dust.
- Bosch: A well-known brand offering a wide range of brake pads for various vehicles.
- Brembo: A popular choice for high-performance vehicles, known for their excellent stopping power.
- Raybestos: A trusted brand offering reliable and durable brake pads.
- Wagner: Offers a variety of brake pads, including their ThermoQuiet line known for its quiet operation.
Product Recommendations and Comparisons Best Brake Pads for Different Needs Brake Pad Reviews and Prices
Here are a few specific brake pad recommendations based on different needs and budgets:
- For Everyday Driving (Budget-Friendly): Raybestos Service Grade Brake Pads. These are a great option for everyday driving. They're affordable, reliable, and offer good stopping power. Expect to pay around $30-$50 per set. These are semi-metallic, so they might generate a bit more dust than ceramic, but they're a solid value.
- For Everyday Driving (Premium): Akebono ProACT Ultra-Premium Ceramic Brake Pads. If you're looking for a premium brake pad that's quiet, low-dust, and long-lasting, the Akebono ProACT is a great choice. They're ceramic, so they'll be gentle on your rotors and won't produce a lot of brake dust. Expect to pay around $60-$90 per set. These are ideal for commuters and drivers who prioritize a clean and quiet braking experience.
- For Performance Driving: Brembo Ceramic Brake Pads. Brembo is synonymous with performance braking. Their ceramic brake pads offer excellent stopping power and fade resistance, making them a great choice for performance driving. Expect to pay around $80-$120 per set. These are designed for drivers who demand the best possible braking performance, even under demanding conditions.
- For Trucks and SUVs: Power Stop Z36 Truck & Tow Brake Pads. If you drive a truck or SUV, you need brake pads that can handle the extra weight and towing demands. The Power Stop Z36 Truck & Tow brake pads are designed specifically for these vehicles. They offer excellent stopping power and are resistant to fade. Expect to pay around $70-$100 per set. These pads are formulated to provide consistent braking performance even when towing heavy loads.
Comparison Table:
| Brake Pad Brand | Material | Pros | Cons | Price (Approx. per set) | Best For |
|---|---|---|---|---|---|
| Raybestos Service Grade | Semi-Metallic | Affordable, Reliable | More Dust | $30-$50 | Everyday Driving (Budget) |
| Akebono ProACT | Ceramic | Quiet, Low Dust, Long Lasting | More Expensive | $60-$90 | Everyday Driving (Premium) |
| Brembo Ceramic | Ceramic | Excellent Stopping Power, Fade Resistance | Expensive | $80-$120 | Performance Driving |
| Power Stop Z36 | Carbon-Fiber Ceramic | Excellent Stopping Power for Trucks/SUVs, Towing | Can be Noisy | $70-$100 | Trucks and SUVs |
Remember to always check the specific fitment for your vehicle before purchasing any brake pads. You can usually do this on the retailer's website or by consulting with a mechanic.
Replacing Your Brake Pads DIY vs Professional Brake Service Pros and Cons
Replacing your brake pads is a relatively straightforward job, but it does require some mechanical skill and knowledge. If you're comfortable working on your car, you can save money by doing it yourself. However, if you're not confident in your abilities, it's best to leave it to a professional. Here's a quick rundown of the pros and cons of each option:
DIY Brake Pad Replacement:
- Pros:
- Save Money on Labor Costs
- Gain a Sense of Accomplishment
- Learn About Your Car's Brakes
- Cons:
- Requires Mechanical Skill and Knowledge
- Can Be Time-Consuming
- Potential for Mistakes
- Requires Specific Tools
Professional Brake Service:
- Pros:
- Ensures Proper Installation
- Peace of Mind
- Warranty on Parts and Labor
- Convenience
- Cons:
- More Expensive
- Less Control Over Parts Selection
If you decide to replace your brake pads yourself, be sure to follow the instructions in your car's repair manual or watch a reputable online tutorial. And always, always prioritize safety!
Tips for Extending Brake Pad Life Car Care Tips Brake Maintenance Best Practices
Want to make your brake pads last longer? Here are a few tips:
- Avoid Hard Braking: The harder you brake, the faster your brake pads will wear out. Try to anticipate traffic and brake smoothly.
- Don't Ride the Brakes: Resting your foot on the brake pedal can cause the brake pads to drag slightly, which can lead to premature wear.
- Keep Your Car Light: The heavier your car, the harder your brakes have to work. Remove any unnecessary weight from your car.
- Properly Maintain Your Brakes: Have your brakes inspected regularly by a professional mechanic. They can identify any potential problems and recommend preventative maintenance.
- Use Engine Braking: Downshifting to a lower gear can help slow your car down, reducing the amount of work your brakes have to do.
Understanding Brake Pad Wear Indicators Brake Pad Maintenance Schedules
Most brake pads have wear indicators built into them. These indicators are designed to make noise when the brake pads are worn to a certain point, alerting you that it's time to replace them. There are two main types of wear indicators:
- Mechanical Wear Indicators: These are small metal tabs that are attached to the brake pads. When the brake pads wear down to a certain point, the tab will rub against the rotor, creating a squealing noise.
- Electrical Wear Indicators: These are sensors that are embedded in the brake pads. When the brake pads wear down to a certain point, the sensor will trigger a warning light on your dashboard.
The frequency at which you need to replace your brake pads will depend on a variety of factors, including your driving style, the type of brake pads you use, and the conditions in which you drive. As a general rule, it's a good idea to have your brakes inspected every 6 months or 6,000 miles.
:max_bytes(150000):strip_icc()/277019-baked-pork-chops-with-cream-of-mushroom-soup-DDMFS-beauty-4x3-BG-7505-5762b731cf30447d9cbbbbbf387beafa.jpg)